Cal's Crochet Corner (![[personal profile]](https://www.dreamwidth.org/img/silk/identity/user.png) calaidicrochet) wrote2020-01-19 01:57 am
calaidicrochet) wrote2020-01-19 01:57 am
Entry tags:
A Double-Sided, Slightly Denser Potholder
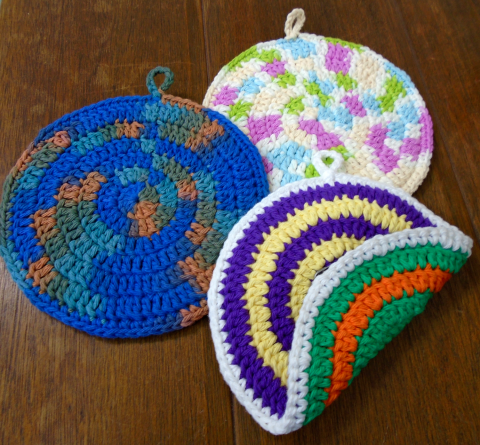
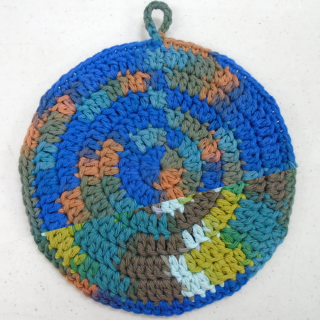
I love the look of simple, round potholders, but I don’t love how far apart the double crochets end up in the outer rounds compared to the inner ones. I just need a little more material between my fingers and a hot pan, you know? Thus, I created this, a slightly denser potholder, which utilizes a simple trick to add a few more “stitches” without actually changing any of the usual stitch counts.
A Double-Sided, Slightly Denser Potholder

Yarn: worsted weight cotton (100% cotton is best, but anything at least 80% cotton will do. Try to steer clear of anything containing acrylic.)
Hook: 3.75 / F
Skill level: easy
Finished size: ~6” in diameter
Written using US terms
Notes:
Abbreviations used:
ch - chain
dc - double crochet
slst - slip stitch
st(s) - stitch(es)
Special stitches:
dc2tog - (yo, insert hook into st and draw up a loop, yo and pull through 2 loops) repeat 2 times in same st, yo and pull through 3 loops


Finally, the Pattern:
Base Circles (make 2)
Round 1: start with a magic circle. ch 2, 12 dc. pull circle closed, slst into first dc. (12)
Round 2: ch 2, 2 dc in each st around, slst into first dc. (24)
Round 3: ch 2, 1 dc in same st, 2 dc in next st, [1 dc in next st, 2 dc in next st] repeat around, slst into first dc (36)
Round 4: ch 2, 1 dc in same st, 1 dc in next st, 2 dc in next st, [1 dc in each of next 2 sts, 2 dc in next st] repeat around, slst into first dc (48)
Up until this point, it’s just your basic dc circle, but here’s where you’ll need to start paying attention.
Round 5: ch 2, 1 dc in same st, dc2tog in next st, 1 dc in next st, 2 dc in next st, [1 dc in next st, dc2tog in next st, 1 dc in next st, 2 dc in next st] repeat around, slst into first dc (60)
Round 6: ch 2, 1 dc in same st, dc2tog in next st, 1 dc in each of next 2 sts, 2 dc in next st, [1 dc in next st, dc2tog in next st, 1 dc in next 2 sts, 2 dc in next st] repeat around, slst to first dc (72)

If this is the first circle (or you’re doing the edging in a different color), fasten off & weave in ends. If you want, you could leave the finishing end hanging on the inside of the potholder, but I recommend securing the center end to keep the magic circle from working itself loose.
If this is the second circle (and you're not doing the edge in another color), do not break off yarn. Secure the center end and continue on to round 7.
Finishing:
Put both circles together, wrong sides facing. Work through both loops of both circles.
Round 7: ch 1 (still doesn’t count as a st), sc in the same st, 1 sc in each of the next 4 sts, 2 sc in the next st, [1 sc in next 5 sts, 2 sc in next st] repeat around. slst to the first sc, ch 10, slst into the first slst, slst into the first sc. fasten off & weave in ends.

Stripes Variation:
For the neatest look, the designer recommends breaking off the yarn & joining with an invisible join at the end of each color change, and beginning the next row with a standing dc. But regular slsts and color changes will also work just fine.
If changing color after round 1: round 1 can stay the same, or it can be changed to ch 2, 11 dc, invisible join to first dc (counts as a st)
If using standing dc & invisible join: work around join loops AND standing dc loops. The invisible join loops here do not count as their own st.


Larger Variation:
So here’s the secret: all we’re doing is replacing one of the stand alone dcs in the regular dc circle repeats with a dc2tog, so that no round has more than two (2) lone dcs next to each other. So if you want to make a bigger circle, all you have to do is keep doing that.
Round 7: ch 2, [1 dc, 1 dc2tog, 1 dc, 1 dc2tog, 1 dc, 2 dc in same st] repeat
Round 8: ch 2, [1 dc, 1 dc2tog, 2 dc in next 2 st, 1 dc2tog, 2 dc in same st] repeat
Etc.

You may sell items created from this pattern. You may NOT sell this pattern or copy it to another site. You may, however, share links to this pattern wherever you might want to.
❤️ save this pattern on Ravelry ❤️


Yarn: worsted weight cotton (100% cotton is best, but anything at least 80% cotton will do. Try to steer clear of anything containing acrylic.)
Hook: 3.75 / F
Skill level: easy
Finished size: ~6” in diameter
Written using US terms
Notes:
- The ch2 at the beginning of each round DOES NOT count as a stitch. The first dc of each round is worked into the same stitch as the slip stitch join and the ch2. At the end of each round, slip stitch into the top of the actual dc, not the ch2.
- Gauge doesn’t matter, but you do want your stitches to be pretty tight and close together (the idea is to reduce the chance of your fingers touching your hot pans as much as possible, after all!). If you tend to crochet loosely, try going down a hook size or two.
- This potholder is made of two circles crocheted together at the end. The first circle made is the backside, and at the end of the second circle, you continue on with that yarn to crochet them together, so plan accordingly. Or feel free to do whatever you want! After all, I also have an example where you don’t do that.
- Your circles will probably not lie flat at the end of round 6 (at least, mine never do, lol). They’ll flatten out once they’re crocheted together.
Abbreviations used:
ch - chain
dc - double crochet
slst - slip stitch
st(s) - stitch(es)
Special stitches:
dc2tog - (yo, insert hook into st and draw up a loop, yo and pull through 2 loops) repeat 2 times in same st, yo and pull through 3 loops


Finally, the Pattern:
Base Circles (make 2)
Round 1: start with a magic circle. ch 2, 12 dc. pull circle closed, slst into first dc. (12)
Round 2: ch 2, 2 dc in each st around, slst into first dc. (24)
Round 3: ch 2, 1 dc in same st, 2 dc in next st, [1 dc in next st, 2 dc in next st] repeat around, slst into first dc (36)
Round 4: ch 2, 1 dc in same st, 1 dc in next st, 2 dc in next st, [1 dc in each of next 2 sts, 2 dc in next st] repeat around, slst into first dc (48)
Up until this point, it’s just your basic dc circle, but here’s where you’ll need to start paying attention.
Round 5: ch 2, 1 dc in same st, dc2tog in next st, 1 dc in next st, 2 dc in next st, [1 dc in next st, dc2tog in next st, 1 dc in next st, 2 dc in next st] repeat around, slst into first dc (60)
Round 6: ch 2, 1 dc in same st, dc2tog in next st, 1 dc in each of next 2 sts, 2 dc in next st, [1 dc in next st, dc2tog in next st, 1 dc in next 2 sts, 2 dc in next st] repeat around, slst to first dc (72)

If this is the first circle (or you’re doing the edging in a different color), fasten off & weave in ends. If you want, you could leave the finishing end hanging on the inside of the potholder, but I recommend securing the center end to keep the magic circle from working itself loose.
If this is the second circle (and you're not doing the edge in another color), do not break off yarn. Secure the center end and continue on to round 7.
Finishing:
Put both circles together, wrong sides facing. Work through both loops of both circles.
Round 7: ch 1 (still doesn’t count as a st), sc in the same st, 1 sc in each of the next 4 sts, 2 sc in the next st, [1 sc in next 5 sts, 2 sc in next st] repeat around. slst to the first sc, ch 10, slst into the first slst, slst into the first sc. fasten off & weave in ends.

Stripes Variation:
For the neatest look, the designer recommends breaking off the yarn & joining with an invisible join at the end of each color change, and beginning the next row with a standing dc. But regular slsts and color changes will also work just fine.
If changing color after round 1: round 1 can stay the same, or it can be changed to ch 2, 11 dc, invisible join to first dc (counts as a st)
If using standing dc & invisible join: work around join loops AND standing dc loops. The invisible join loops here do not count as their own st.


Larger Variation:
So here’s the secret: all we’re doing is replacing one of the stand alone dcs in the regular dc circle repeats with a dc2tog, so that no round has more than two (2) lone dcs next to each other. So if you want to make a bigger circle, all you have to do is keep doing that.
Round 7: ch 2, [1 dc, 1 dc2tog, 1 dc, 1 dc2tog, 1 dc, 2 dc in same st] repeat
Round 8: ch 2, [1 dc, 1 dc2tog, 2 dc in next 2 st, 1 dc2tog, 2 dc in same st] repeat
Etc.

You may sell items created from this pattern. You may NOT sell this pattern or copy it to another site. You may, however, share links to this pattern wherever you might want to.
❤️ save this pattern on Ravelry ❤️
