Cal's Crochet Corner (![[personal profile]](https://www.dreamwidth.org/img/silk/identity/user.png) calaidicrochet) wrote2023-10-07 07:28 pm
calaidicrochet) wrote2023-10-07 07:28 pm
Entry tags:
Lattice Pie Earrings (free crochet pattern)
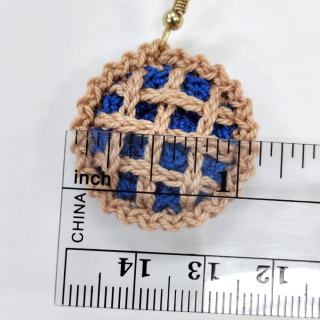
When I think of pies, the image that comes to mind is a fruit pie with a lovely lattice on top. So while I was already working on making some miniature pies, I had to try to figure out how to make these iconic type of pies too. Here's what I came up with~!
Of course, you don't have to limit yourself to just making earrings or any other jewelry; these little pies also look great as refrigerator magnets, or as an accessory for Barbie or other fashion dolls.
Lattice Pie Earrings

Materials:
earring hooks
jump rings
small pliers
needle
scissors
Hook: 1.5 mm steel hook
Skill Level: Intermediate
Finished Size: 1 1/8” in diameter, or just under 3cm
Written using US terms.
Notes:
Of course, you don't have to limit yourself to just making earrings or any other jewelry; these little pies also look great as refrigerator magnets, or as an accessory for Barbie or other fashion dolls.

Materials:
- Cotton crochet thread (size 10) in the colors red or blue (A) and tan (B)
- I used Red Heart Classic Crochet Thread (Size 10) in the colors:
- Victory Red (A)
- and Aunt Lydia’s Size 10 Thread in the colors:
- Dark Royal (A)
- Copper Mist (B)
- I used Red Heart Classic Crochet Thread (Size 10) in the colors:
Hook: 1.5 mm steel hook
Skill Level: Intermediate
Finished Size: 1 1/8” in diameter, or just under 3cm
Written using US terms.
Notes:
- I use a chainless starting double crochet at the beginning of each dc round, and this is included in my stitch counts. I feel this gives it the cleanest look. However, you can start your dc rounds whichever way you’re most comfortable with, as long as your stitch count ends up right in the end.
Here are links to a photo and text tutorial and a video tutorial of the chainless starting double crochet if you want to learn it & try it out. - I use an invisible join to fasten off, because, again, this gives it the cleanest look. Here is a great photo and text tutorial of the invisible join if you’re not sure how to do it. Follow the instructions for “invisible join with a standing stitch” and make sure the join loops go over the first stitch of the round—this keeps the stitch counts correct in the end.
- Lattice Chain 1 (LC1): Insert the hook into the “back” back loop of the st and pull through a loop. Leave a ~2” tail. Chain 11. Fasten off.
Turn your work so the right side is facing. Using your hook (or a needle), thread LC1 under the back loop to the right side of the work. It will end up between the two main loops of the stitch, with the back loop on top. Pull through, but leave about a chain or two on the “backside”.
Moving clockwise, find the 8th stitch over and thread LC1 between the two top loops. Pull through to the backside. There should be about a chain left over, and the back loop of round 2 will be on top of LC1 again.
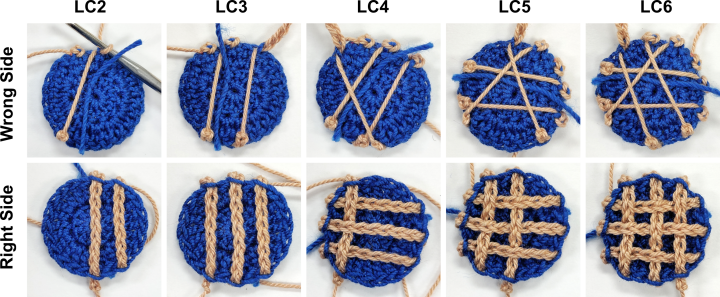
Turn your work back to the wrong side. Lattice Chain 1 completed. - Lattice Chain 2 (LC2): Find the beginning of LC1. Working clockwise, skip one st, work into the next stitch (pull the “tail” leading from the end of LC1 snug, but not so tight that it’s collapsing your work). Chain 12, fasten off.
Turn to the right side. Pull chain through to the front. Count clockwise 12 sts OR 2 sts from the end of LC1. Pull chain through to the back. Turn to the wrong side. - Lattice Chain 3 (LC3): Find the beginning of LC2. Working clockwise, sk one st, work into the next stitch. Chain 11, fasten off.
Turn to the right side. Pull chain through to the front. Count counterclockwise 8 sts OR 2 sts clockwise from the end of LC2. Pull chain through the the back. Turn to the wrong side. - Lattice Chain 4 (LC4): Find the beginning of Lattice Chain 1. Working counterclockwise, sk one st, work into the next st. Chain 11, fasten off.
Turn to the right side & pull chain through to the front. Thread LC4 over the first chain, under the second, and over the third. Count counterclockwise 8 sts OR 2 sts clockwise from the beginning of chain 3 (LC3). Pull chain through to the back & turn to the wrong side. - Lattice Chain 5 (LC5): Find the beginning of LC4. Working counterclockwise, sk one st, work into the next st. Chain 12, fasten off.
Turn to the right side & pull chain through to the front. Thread LC5 under the first chain, over the second, and under the third. Count counterclockwise 12 sts OR 2 sts counterclockwise from the end of LC4. Pull chain through to the back & turn to the wrong side. - Lattice Chain 6 (LC6): Find the beginning of LC5. Working counterclockwise, sk one st, work into the next st. Chain 11, fasten off.
Turn to the right side & pull chain through to the front. Thread LC6 over the first chain, under the second, and over the third. Count clockwise 8 sts OR 2 sts counterclockwise from the end of LC5. Pull chain through to the back & turn to the wrong side.
Abbreviations:
sc - single crochet
dc - double crochet
ch - chain
slst - slip stitch
st(s) - stitch(es)

Finally, the Pattern:
Pie Filling (make 2)
Using color A:
Round 1: 12 dc into a magic ring, pull circle closed, slst into first dc (12)
Round 2: 2 dc in each st around, invisible join to fasten off (24)
Mark off the first stitch of the round (the one that was just covered by the invisible join).
Lattice
Using color B:
Cut a piece of thread approximately 3 feet or 1 meter. Turn your work so the wrong side is facing you.
For the lattice, we’ll primarily be working into the “back” back loop of the double crochet stitch. With the wrong side facing, this is the loop immediately below the top loop of the stitch.
Start in one of the stitches next to the first st of round 2.

Each Lattice Chain will be worked the same way, with the only difference being which stitches are being worked into and out of, and the number of chains. At the end, there will be a Lattice Chain going through every other stitch.
But! They are worked in a very specific order, so let’s continue.
Starting with Lattice Chain 4, we’re moving in the other direction, and we start doing some weaving.
Secure the ends. I threaded them under all the little crisscrossing threads of the lattice chains & tied off around them to tighten everything up a little more, but you don’t have to.
And that’s the filling done!

Pie Crust
Using color B:
Round 1: 12 dc into a magic circle, pull circle closed, slst into first dc (12)
Round 2: 2 dc in each st around, slst into first dc, ch 1 (24)
Secure the center end.
Put a pie filling circle and the pie crust circle together, wrong sides facing. Turn your work so the filling circle is facing you.
Work the next round through the back loops of the filling circle and the “front” loops (which are the back loops when the right side is facing you) of the crust circle. Basically, when the two circles are held together, we’re working into the two loops in the middle and leaving the two outside loops alone.
The stitches between the stitches with the lattice may be tricky to find, especially at the “corners”, so be careful not to miss any!
The ends of the lattice chains might seem to be in the way, but just push them down or work around them. They’ll disappear into the pie by the end.

Round 3: 1 sc into the first st and into each st around, slst into the first sc (24)
Round 4: working into both loops of round 3: ch 1, sl st into the same st, [ch 1, sl st in the next st] in each st around, finishing with a slst into the same st as the first slst. Fasten off & weave in ends.
Congrats, you now have a tiny pie~! Repeat to make the second pie.

Finishing:
No need to block or stiffen! These will keep their shape on their own.
If the lattice chains are out of place or squashed after finishing everything, you can just nudge them back into place and adjust them to be how you want.
For earrings, attach findings through a chain stitch of round four. Or, thread a jump ring/earring hook onto the yarn before starting the crust & work it into the chains of round four.
Don’t limit yourself to earrings! These little pies would also make a cute necklace pendant or bracelet charm, or grab some glue and make them into charming refrigerator magnets. They’re also an okay size for Barbie and other fashion dolls.
The possibilities are endless!

You may sell items created from this pattern. You may NOT sell this pattern or copy it to another site. You may, however, share links to this pattern wherever you might want to.
❤️ save this pattern on Ravelry ❤️

no subject
Lattice chains
(Anonymous) 2024-11-01 06:26 pm (UTC)(link)Re: Lattice chains
By "fasten off", I mean the part where you pull the thread all the way through the last chain and pull it tight to secure it, like you would if you were finishing off a project. You should be left with a long piece of "extra" thread, which you then thread through the indicated stitches to the back and back to the front, where you start the next chain with at same piece of thread. It sounds like maybe you've been cutting it short each time? I'm really sorry for any confusion, but don't do that, just leave it as one piece.
However! I did try cutting it each time when I was developing it, and what I did was to tie the two ends of each "piece of lattice" together on the backside to secure them and then cut the ends short (to reduce bulk, mostly).
I decided in the end that using one long piece was less hassle and used less thread than using six smaller pieces & tying them off, but it absolutely can be done that way too. When you attach the crust piece to the back, it covers all of that up, so there's no need to weave any ends in (and it's okay if it was a bit messy. no one will know ;) ).